Introduction
Recently I was building a new repo in GitHub and realized I needed a new SSH key to push to GitHub. Upon bringing up GitHub's SSH creation UI, I was prompted by 1Password with a "Create SSH Key..." option. Apparently I had opted into SSH-key creation 1Password and forgotten. What ensued was a few hours of overhauling how I maintain my GitHub SSH keys entirely. In this post, I'll walk you through how I've begun to maintain multiple accounts with 1Password's SSH Key management system (hint: as of 8/21/22 don't follow the 1Password's instructions...).
Setting Up Multiple GitHub Accounts with SSH
Let's say you're like me and maintain multiple GitHub accounts. From experience you've realized that SSH Keys ("Secure Shell Keys") are a secure, simple method to access these accounts. Typically, you'd open your shell, type ssh-keygen -t rsa, point your file to an ~/.ssh/... folder, and you'd be off to the races. Now, if you use 1Password, you can simply follow these instructions.
1Password
First, we're going to activate 1Password's SSH key generation option (that I forgot I had activated...)
-
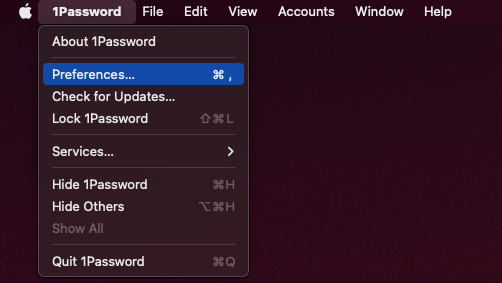
In your 1Password, go to your ribbon and select 1Password -> Preferences (or type CMD + ,)
-
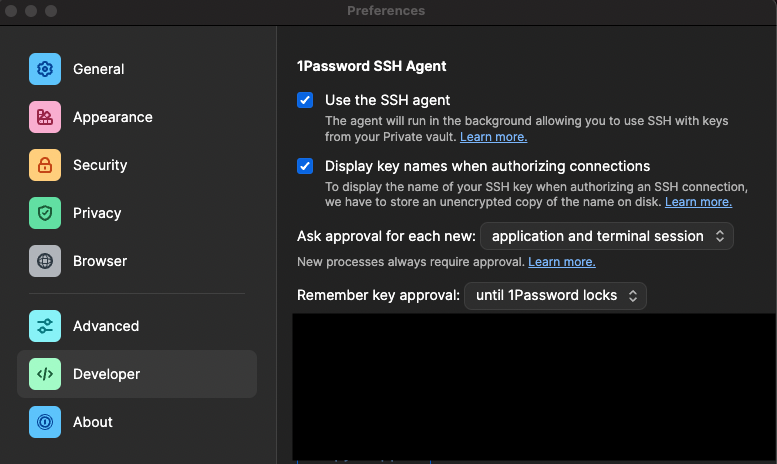
In the Preferecnes screen, press Developer, then check the Use the SSH agent and Display key names when authorizing connections boxes.
GitHub
Next, we need to generate the key and add it to GitHub.
- Login to your GitHub Account
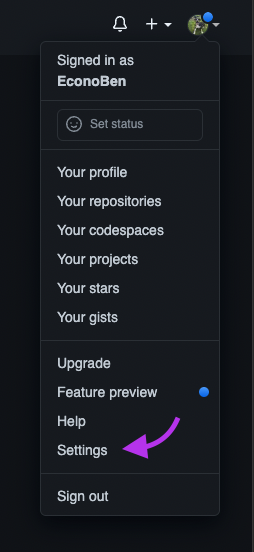
- Navigate to Settings
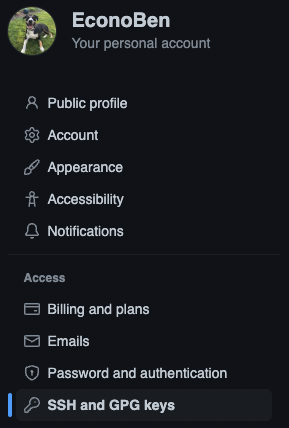
- Select SSH and GPG Keys
- New SSH key
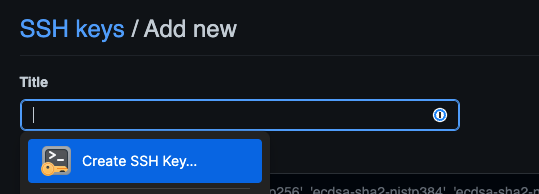
- Click into title (if not logged into 1Password, select the icon and log in)
- Select
Create SSH Key
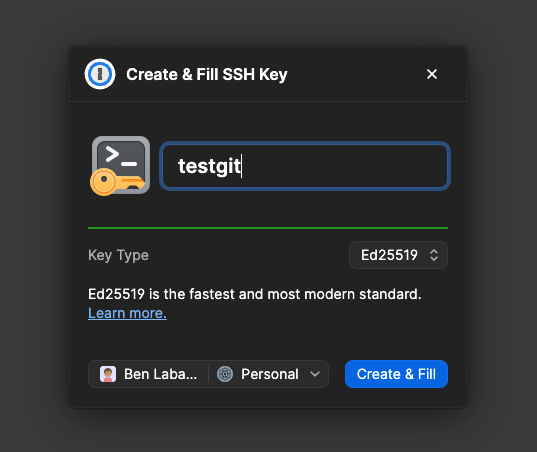
- In the 1Password prompt, enter a simple, one-word title and select ed25519
- Press
Create & Fill then Submit.
To 1Password Once More...
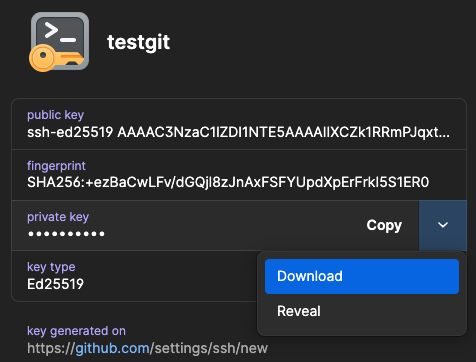
Now that our key has been generated and assigned to GitHub, we need to grab the information we need.
-
In your 1Password, go to your newly formed ssh key and download the private key.
- Fun Fact: 1Password's instructions tell you to download the public key. This does not work (and should not work). DO NOT FOLLOW THESE INSTRUCTIONS.
To The Terminal! SSH and Git
Now that we have our private SSH key that we assigned to GitHub, we simply need to add that information to an ~/.ssh/config file and connect our repo to Git.
First need to move our private key to its proper folder:
- Open your terminal and type
mv ~/Downloads/id_ed25519 ~/.ssh/[FILE NAME], where FILE NAME is whatever you'd like to call the private key file. I think testgitkey makes sense, so that's what I'll call it:
Next, we need to use our .ssh/config file to instruct our computer how to use our .ssh file. If you don't have an .ssh/config file, simply enter touch ~/.ssh/config in your terminal.
-
Access your ~/.ssh/config either by open ~/.ssh/config or something like vi ~/.ssh/config.
-
Paste the following information into your config file, replacing the information as needed
1# Test GitHub
2Host testgit
3HostName github.com
4User git
5IdentityFile ~/.ssh/testgitkey
6IdentitiesOnly yes
Notice that I provided Host the exact same name as was written in GitHub's title field. In the same vein, next to IdentityFile, be sure to enter the name you gave your downloaded private key from 1Password.
Finally, we get to connect our GitHub to 1Password!
- Navigate to a local GitHub directory you'd like to push.
- Set the remote url to as follows:
<HOST>:<ACCOUNT NAME>/<REPO NAME>.git
e.g. git remote set-url origin testgit:Econoben/testrepo.git
That's it! Simply rinse and repeat for each GitHub account you maintain, adding each account to your ~/.ssh/config. Happy coding.