Adding Text-to-Speech to Your Blog: Building an OpenAI TTS Pipeline with Smart Chunking and AWS S3
A technical deep-dive into building a production-ready text-to-speech pipeline for blog posts using OpenAI's TTS API, smart text processing with NLP, automatic chunking for long content, and AWS S3 for scalable audio hosting.
Published June 29, 20258 min readFiled in June 2025
If you're reading this post then you probably want to add audio versions to your blog posts. Perhaps you've noticed more sites offering "listen to this article" features, or maybe you just want to make your content more accessible.
Whatever your reason, I'll show you exactly how I built a complete text-to-speech pipeline that automatically generates high-quality audio for every post on this blog—including the one you're reading right now.
This post assumes the following of you:
You have a Node.js-based blog or can integrate Node scripts into your build process
You have an OpenAI API key (for their TTS service)
You have an AWS account with S3 access
You're comfortable with basic command-line tools
You want professional-quality audio without manual recording
Alright, let's get to it.
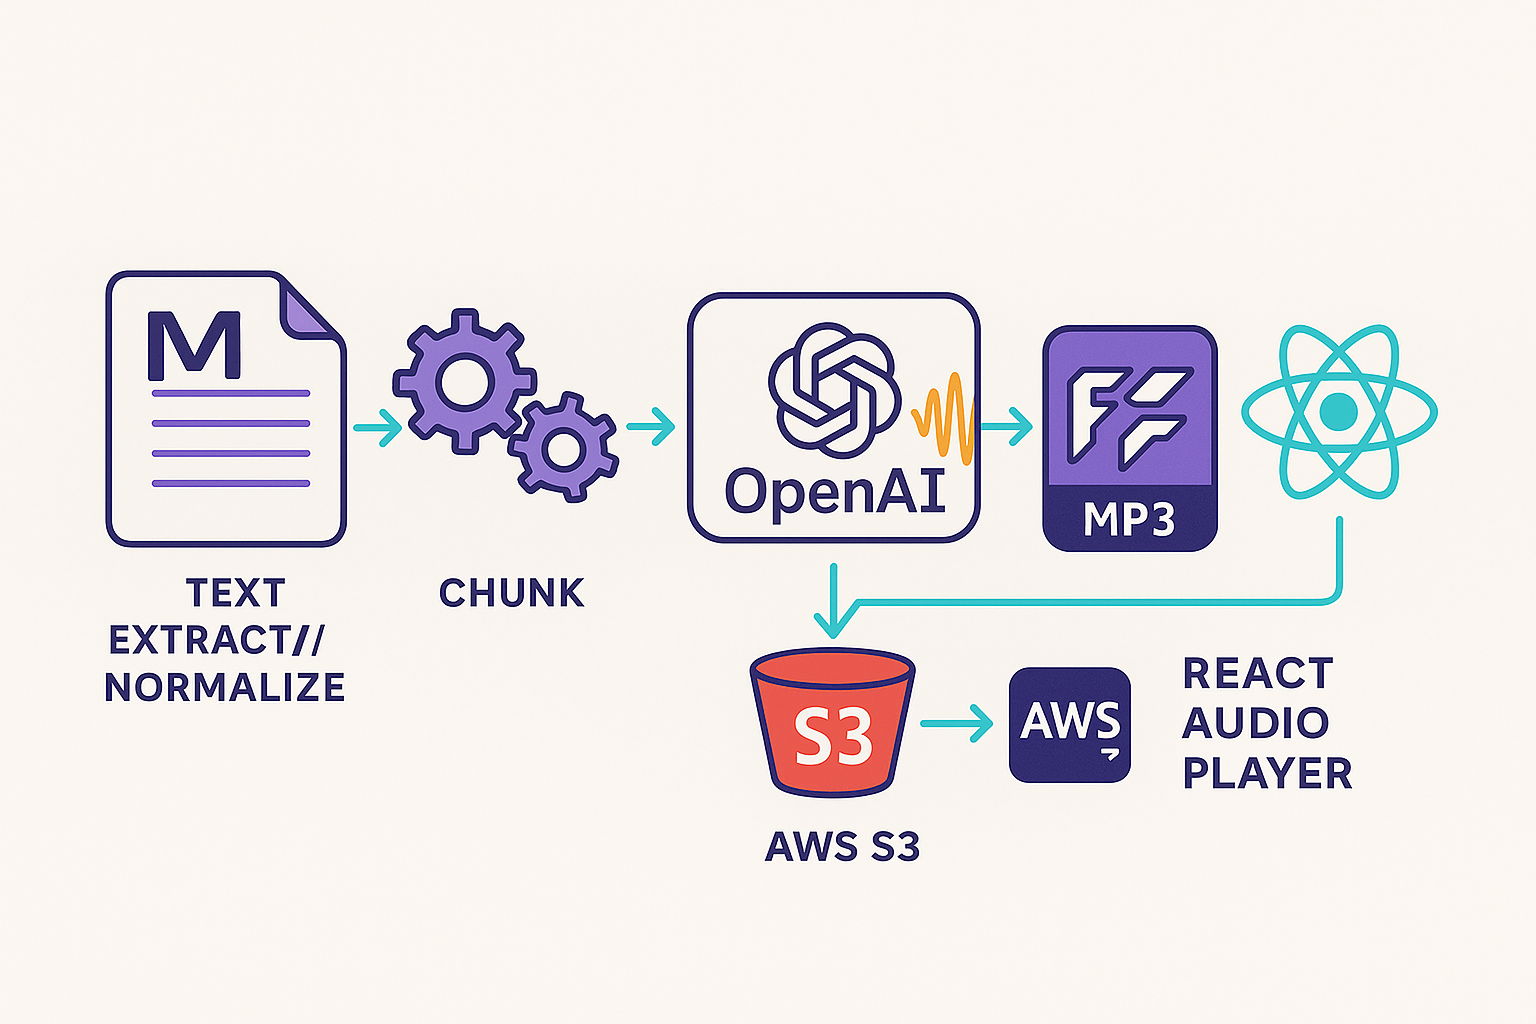
The Architecture
Here's how the pipeline works end-to-end:
The beauty of this system is that it's fully automated. Write a post, run the build, and audio appears. No manual steps, no recording equipment, just code.
Text Processing: Making Markdown Sound Natural
The first challenge is that blog posts aren't written to be read aloud. They contain:
Code blocks that shouldn't be narrated
Abbreviations like "API" or "AWS"
Special formatting like $53k or "Dec 2021"
Emojis and special characters
Links and images
Here's how I handle text extraction using the Compromise NLP library (full source):
JavaScript
1// Extract and normalize text content from markdown2functionextractTextFromMarkdown(markdown){3// Remove frontmatter4let content = markdown.replace(/^---[\s\S]*?---\n/,'');56// Remove all emojis and special Unicode characters7 content = content.replace(/[\u{1F300}-\u{1F9FF}]|[\u{1F600}-\u{1F64F}]|[\u{1F680}-\u{1F6FF}]|[\u{2600}-\u{26FF}]|[\u{2700}-\u{27BF}]|[\u{1F900}-\u{1F9FF}]|[\u{1F1E0}-\u{1F1FF}]/gu,'');89// Remove code blocks entirely10 content = content.replace(/```[\s\S]*?```/g,'');1112// Handle inline code - replace with the word or phrase without backticks13 content = content.replace(/`([^`]+)`/g,'$1');1415// Extract link text, removing the URL16 content = content.replace(/\[([^\]]+)\]\([^)]+\)/g,'$1');1718// Use compromise to process the text19let doc =nlp(content);2021// Expand contractions22 doc.contractions().expand();2324// Process money values25const moneyMatches = doc.match('$#Value');26 moneyMatches.forEach(m=>{27const text = m.text();28if(text.match(/\$\d+k/i)){29const num = text.match(/\d+/)[0];30 m.replaceWith(`${num} thousand dollars`);31}32});3334// Handle common abbreviations35const abbreviations ={36'API':'A P I',37'URL':'U R L',38'HTTP':'H T T P',39'HTTPS':'H T T P S',40'AWS':'A W S',41'GPU':'G P U',42// ... many more43};4445return content.trim();46}
Example Processing Output
Here's what the normalization does to actual text:
Original:
Text
1This year, I successfully paid off my private student loans by paying down the remaining $53k I had left.
2I've been working on the API for NormConf using AWS.
Processed:
Text
1This year, I successfully paid off my private student loans by paying down the remaining 53 thousand dollars I had left.
2I have been working on the A P I for NormConf using A W S.
The difference is subtle but crucial for natural-sounding speech.
Chunking: Working Around OpenAI's 4096 Character Limit
OpenAI's TTS API has a hard limit of 4096 characters per request. For longer posts (like my student loans story at 43,138 characters), we need intelligent chunking (view on GitHub):
JavaScript
1functionsplitTextIntoChunks(text, maxChars){2if(text.length<= maxChars){3return[text];4}56const chunks =[];78// First try to split by double newlines (paragraphs)9const paragraphs = text.split(/\n\n+/);10let currentChunk ='';1112for(const paragraph of paragraphs){13const trimmedParagraph = paragraph.trim();14if(!trimmedParagraph)continue;1516// If a single paragraph is too long, split by sentences17if(trimmedParagraph.length> maxChars){18if(currentChunk.trim()){19 chunks.push(currentChunk.trim());20 currentChunk ='';21}2223// Use NLP to split by sentences24const doc =nlp(trimmedParagraph);25const sentences = doc.sentences().out('array');2627for(const sentence of sentences){28if((currentChunk +' '+ sentence).length> maxChars && currentChunk.length>0){29 chunks.push(currentChunk.trim());30 currentChunk = sentence;31}else{32 currentChunk +=(currentChunk ?' ':'')+ sentence;33}34}35}else{36// Check if adding this paragraph would exceed the limit37const separator = currentChunk ?'\n\n':'';38const combined = currentChunk + separator + trimmedParagraph;3940if(combined.length> maxChars && currentChunk.length>0){41 chunks.push(currentChunk.trim());42 currentChunk = trimmedParagraph;43}else{44 currentChunk = combined;45}46}47}4849return chunks;50}
This approach ensures we:
Never break in the middle of a sentence
Prefer paragraph boundaries when possible
Handle edge cases like single paragraphs longer than 4096 chars
Audio Generation and Concatenation
Once we have our chunks, we generate audio for each and use FFmpeg to concatenate them seamlessly:
JavaScript
1// Generate audio for each chunk2const chunkPaths =[];3for(let i =0; i < chunks.length; i++){4const chunkPath = path.join(AUDIO_OUTPUT_DIR,`${filename}_chunk_${i}.mp3`);5console.log(` Generating chunk ${i +1}/${chunks.length} (${chunks[i].length} chars)...`);67awaitgenerateAudio(chunks[i], chunkPath);8 chunkPaths.push(chunkPath);9}1011// Concatenate with FFmpeg12if(hasFfmpeg){13console.log(` Concatenating ${chunks.length} chunks with ffmpeg...`);14awaitconcatenateAudioFiles(chunkPaths, audioPath);1516// Clean up chunk files17for(const chunkPath of chunkPaths){18await fs.unlink(chunkPath);19}20}
The FFmpeg concatenation ensures there are no gaps or glitches between chunks—the audio flows naturally as if it were generated in one piece.
Caching: Don't Regenerate Unchanged Content
To avoid unnecessary API calls and costs, I implement content-based caching:
JavaScript
1// Calculate hash of processed text2const contentHash =calculateHash(textContent);34// Check if audio already exists and content hasn't changed5if(!forceRegenerate && cache[filename]&& cache[filename].hash=== contentHash){6try{7await fs.access(audioPath);8console.log(` ✓ Audio already exists and is up to date`);9return{ filename, audioFilename,status:'cached'};10}catch{11console.log(` Audio file missing, regenerating...`);12}13}
The cache tracks:
Content hash (MD5 of processed text)
Generation timestamp
Character count
Number of chunks
Whether the file is complete (all chunks concatenated)
S3 Upload and Distribution
Once audio files are generated, they're uploaded to S3 for global distribution:
JavaScript
1// Upload to S3 with caching headers2const command =newPutObjectCommand({3Bucket:BUCKET_NAME,4Key:`audio/${filename}`,5Body: fileContent,6ContentType:'audio/mpeg',7CacheControl:'public, max-age=31536000',// Cache for 1 year8Metadata:{9'generated-by':'blog-audio-generator',10'source':'openai-tts'11}12});1314await s3Client.send(command);
The upload script also generates a manifest file mapping post slugs to S3 URLs:
JSON
1{2"2022_reflection":"https://tech-notes-blog.s3.us-west-2.amazonaws.com/audio/2022_reflection.mp3",3"building_an_https_model_apI_for_cheap":"https://tech-notes-blog.s3.us-west-2.amazonaws.com/audio/building_an_https_model_apI_for_cheap.mp3",4// ... more posts5}
Frontend: The Audio Player Component
The React audio player provides a clean interface with all the controls readers expect (full component):
Playback speed control (1x, 1.25x, 1.5x, 1.75x, 2x)
Loading states and error handling
Results and Performance
The complete pipeline processes all 14 posts on this blog in about 15 minutes:
11 posts required chunking (2-11 chunks each)
Total of 33 audio chunks generated
Longest post: 43,138 characters (11 chunks)
All audio seamlessly concatenated with FFmpeg
Zero manual intervention required
Cost Analysis
OpenAI TTS pricing:
tts-1-hd: $0.030 per 1,000 characters
Average blog post: ~10,000 characters = $0.30
Total for 14 posts: ~$4.20
AWS S3 costs:
Storage: ~100MB total = $0.0023/month
Bandwidth: Depends on traffic, but audio files are cached for 1 year
The Command Line Interface
Simple npm scripts make the whole process painless:
Bash
1# Generate audio for all posts2npm run generate-audio
34# Generate for specific post5npm run generate-audio post-name
67# Force regenerate (ignore cache)8npm run generate-audio post-name --force910# Upload to S311npm run upload-audio
1213# Full pipeline14npm run process-audio
Lessons Learned
Text normalization is crucial - Raw markdown sounds terrible when read aloud
Smart chunking matters - Breaking at sentence boundaries maintains flow
Reflections on a year of milestones—getting engaged in Florence, publishing with O'Reilly and the AEA, raising a Series A at Workhelix, and overcoming health challenges. Plus, my goals for 2026.